Sunday, April 16, 2017

only show translated menu items into current language (Drupal 8)

function MY_THEME_preprocess_menu(&$variables) {
  if ($variables['menu_name'] == 'brancott-header-menu') {
   $language = Drupal::languageManager()->getCurrentLanguage()->getId();

    foreach ($variables['items'] as $key => &$item) {
      $menuLinkEntity = sapient_brancott_load_link_entity_by_link($item['original_link']);
      if ($menuLinkEntity != NULL) {
        $languages = $menuLinkEntity->getTranslationLanguages();
        // Remove links which is not translated to current language.
        if (!array_key_exists($language, $languages)) {
          unset($variables['items'][$key]);
          continue;
        }
      }
   
    foreach ($variables['items'][$key]['below'] as $key_child => &$item_child) {
      $menuLinkEntity = sapient_brancott_load_link_entity_by_link($item_child['original_link']);
      if ($menuLinkEntity != NULL) {
        $languages = $menuLinkEntity->getTranslationLanguages();
        // Remove links which is not translated to current language.
        if (!array_key_exists($language, $languages)) {
          unset($variables['items'][$key]['below'][$key_child]);
        }
      }
    }

    }
  }
}

function MY_THEME_load_link_entity_by_link(MenuLinkInterface $menuLinkContentPlugin) {
  $entity = NULL;

  if ($menuLinkContentPlugin instanceof MenuLinkContent) {
    list($entity_type, $uuid) = explode(':', $menuLinkContentPlugin->getPluginId(), 2);
    $entity = \Drupal::entityManager()->loadEntityByUuid($entity_type, $uuid);
  }
  return $entity;
}

Wednesday, October 12, 2016

Symfony components in Drupal 8.x

The following are the Symfony components that are going to power the Drupal 8 core to a major extent:
  • HttpKernel and HttpFoundation – These are responsible for streamlining the process of converting a Request into a Response with the help of EventDispatcher. Drupal 8 being moved to Symfony was driven by Web Services and Content Core Initiative (WSCCI) in a motive to transform Drupal from a first-class CMS to a first-class REST server with first-class CMS running on top of it. This initiative is intended to allow Drupal to use web services to offer its content with reduced complexity; considering this as a long term vision, Drupal will be more flexible, robust and easily maintainable CMS.
  • EventDispatcher – Implements the Mediator pattern (that uses encapsulation) in a simple and effective manner especially where code inheritance doesn’t work out, making the application highly extensible. It is more effective in situations where you tend to maintain and/or refactor a program consisting of a huge number of classes due to the fact that it makes the communication amongst the classes quite simple and easy.
  • ClassLoader – Provides tools that autoload classes and caches their location. PHP uses the autoloading mechanism to delegate the loading of a file that defines the class in situations where you reference a class that has not been required or included yet. Symfony comes with autoloaders like PSR-0 Class Loader and MapClassLoader. Implementing theClassLoader component will make Drupal module developers carefree especially when it comes to implementingmodule_load_include and other dependencies. Moreover, it allows developers easy calling of classes during run-time.
  • YAML – It parses YAML strings and converts them to PHP arrays and vice versa. This format has been especially designed to hold configuration related information, while being as expressive as XML files and as readable as INI files. It serves as an integral component of Drupal’s CMI (Configuration Management Initiative) that allows our modules to initially define their default configuration settings and later allows the site builder to override the same as-and-when instructed to. This concept of Drupal 8’s CMI which is powered by YAML is a replacement for Features contributed Drupal module which proves to be a robust concept as far as migrating and deploying across environments is concerned.
  • Routing – Allows us to load all routes, and dumps a URL matcher or generator specific to these routes. This also means that it maps an HTTP request to a set of configuration variables. As far as Drupal 8 and above versions are concerned, we define our module’s routes in a YAML configuration file, each of them set to trigger a specific action that has been defined in our module’s classes.
  • DependencyInjection – Primarily used to standardize and centralize the way objects are constructed in our application. Symfony’s DependencyInjection component has been incorporated in Drupal 8 in an intention to write code in such a way that classes can be reused and unit-tested wherever applicable and desired.
  • Twig – Drupal 8 has adopted the Twig template engine. This is of interest to the themers who will probably never think of any other option again for as long as they’re working on Drupal themes. Twig was developed by Fabien Potencier, who also developed the Symfony project, and was fine tuned for integration into Drupal 8.
  • Process – Helps execute commands in sub-processes using the command-line interface. Drupal 8 will use this to handle all activities that are command-line in nature.
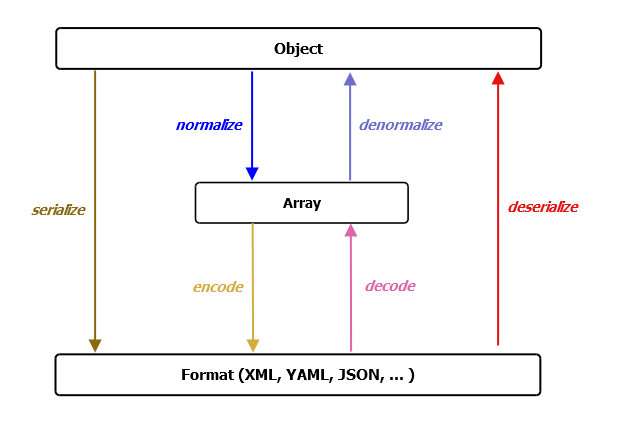
  • Serializer – It is used to transform objects into a specific format (eg. XML, YAML, JSON, etc.) and vice versa. To understand it better, let us look at the following schema that a Serializer component follows:
    Additionally, we can use it to accomplish a number of jobs, ranging from configuration to node and entity creation that should be delivered by a REST endpoint.
  • Validator – Helps Drupal validate values. For example: validating form submission, validating entities within Drupal, etc. To accomplish its job, it uses Doctrine Annotations (discussed in Out-of-the-box third party components section).
  • Translation – Provides a standard set of tools to load translation files, generate translated strings as output, and use the generated outcome.
Courtesy :  https://www.sitepoint.com/symfony-drupal-8/

Wednesday, December 2, 2015

Bulk Content Import Drupal 7 (Feeds Module)

Required modules:
Set up CSV:
Prepare the Excel file that you will convert to CSV - open up Excel and in the first row add the headers. Feeds importer requires a global ID to uniquely identify nodes. So the first column should contain this unique identifier. Name this column "guid". The other column headers can be anything you like. For example, if you want to import a list of files with title; you can name your columns filename, title, description etc. The column headers do not have to match content type fields.
Add data to the Excel file:
  • guid: make sure each row has a unique number.
  • filename: You will have to upload all the files you want to migrate, into your Drupal root directory. So put all your files in a directory called import-uploads and upload them to your Drupal root. Make sure that the filenames have the path from your Drupal root. So each filename should have "import-uploads/" prepended. E.g. "import-uploads/file1.pdf", "import-uploads/file2.avi", etc.
  • title/description: should have text, make sure that your title is less than 256 characters.
Save as CSV - save the Excel file in CSV format - make sure to quote all cells. Otherwise you will run into errors if any of the text (e.g. description) contains commas.
Set up Feeds Importer:
  • Navigate to Structure -> Feeds Importer -> Add Importer.
  • Give your importer a meaningful name like "bulk file upload" and click Submit.
On the next screen follow these directions:
  • Basic Settings: leave as is, no changes needed.
  • Fetched: click "change" and select the "File Upload" option and click save.
  • Fetched Fileupload: click settings, make sure to add all the file extentions you want to add, e.g. pdf, wav, doc, docx etc.
  • Parser: click "change", select the "CSV Parser" option and save.
  • CSV Parser: leave as is.
  • Processor: leave as is (Node Processor).
  • Node Processor: click settings, select "Replace existing node" for "Update exisiting node", select the Content Type you want to use for this import. You may choose to use an existing user as the author.
  • Click Save.
  • Node Processor Mapping: This is where you will map your CSV file headers to the Content Type fields. One by one, add the column headers of the CSV file to the mapping and choose the appropriate Content Type field to map to.
  • Click Save.
Run the import:

  • Navigate to Structure -> Feeds Importer, and click on the "import" link.
  • Click on the Bulk File Upload link.
  • Upload your CSV file into your sites/default/files folder.
  • Upload your import-upload folder, containing all the files to be imported into your Drupal root.
  • Enter your CSV file's name in the File text field.
  • Click on the Import Button.

Thursday, September 17, 2015

How to add extra fields to user profile in Drupal?

Step 1. - Create custom module -For Example My custom module name is extra_user_profile
Folder Name - extra_user_profile
Files - extra_user_profile.nfo, extra_user_profile.module, extra_user_profile.install

Step 2.
extra_user_profile.nfo file:-
name = Extra User Profile
description = Add new field in user profile
core = 7.x
version = "7.x-2.5"
core = "7.x"

Step 3.
extra_user_profile.module file:-
<?php

Step 4.
extra_user_profile.install file:-
<?php

/**
 * Implementation of hook_enable().
 */
function extra_user_profile_enable() {
  // Check if our field is not already created.
  if (!field_info_field('field_nickname')) {
    $field = array(
        'field_name' => 'field_nickname', 
        'type' => 'text', 
    );
    field_create_field($field);

    // Create the instance on the bundle.
    $instance = array(
        'field_name' => 'field_nickname', 
        'entity_type' => 'user', 
        'label' => 'Nick Name', 
        'bundle' => 'user',
        'required' => TRUE,
        'settings' => array(
            'user_register_form' => 1,
        ),
        'widget' => array(
            'type' => 'textfield',
            'weight' => '1',
        ), 
    );
    field_create_instance($instance);
  }
}

Step 5 Enable Module

Now Nickname field is available in User profile page
Enjoy....!!!!

Monday, June 23, 2014

PHP explode() Function

Definition and Usage

The explode() function breaks a string into an array.
Note: The "separator" parameter cannot be an empty string.
Note: This function is binary-safe.

Example

Break a string into an array:
<?php
$str = "My name is KC Verma";
print_r (explode(" ",$str));
?>

Result -
Array ([0] => My [1]=>name [2]=> is [3]=> KC [4] => Verma)

Syntax

explode(separator,string,limit)

ParameterDescription
separatorRequired. Specifies where to break the string
stringRequired. The string to split
limitOptional. Specifies the number of array elements to return.Possible values:
  • Greater than 0 - Returns an array with a maximum of limit element(s)
  • Less than 0 - Returns an array except for the last -limit elements()
  • 0 - Returns an array with one element

Entities (Major difference between Drupal 6 and Drupal 7)

Entities

Maybe you've heard of "entities" in Drupal 7, wondered what they were, and wanted to learn the underlying concepts. Leveraging the Entity API lets you create more lightweight and flexible solutions.
The Drupal community often compares site building through configuration to a favorite childhood toy: LEGO bricks. We can build Entity types, which can make Bundles, to which we can add Fieldsand then create Entities. This article explains the relationships between Entity types > Bundles > Fields > Entities. This was one of the most important changes of Drupal 7, and brought components from some well-loved contributed modules -- such as CCK -- into the core system.
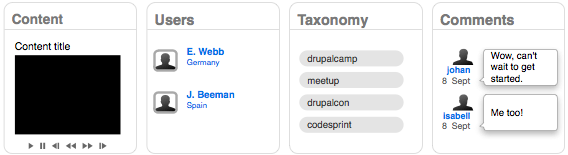
The illustration below shows some examples of Entity types included with Drupal 7, with some example entities:
entity types and some entities
Let’s take a closer look at these concepts. It’s sort of a chicken-and-egg thing, one doesn’t exist without the other.

Entity types

In earlier versions of Drupal, the field system was only used on content types. Now, thanks to the Entity API, we can add fields to other things, like comments. Fieldable entities make Drupal eminently flexible. An entity type is a useful abstraction to group together fields. Let’s consider some examples of entity types:
  • Nodes (content)
  • Comments
  • Taxonomy terms
  • User profiles
You can also build new kinds of entity types where the options above don't suit your needs. For more information, read further about using the hook_entity_info and extension by Entity API:entity_crud_hook_entity_info.

Bundles

Bundles are an implementation of an entity type to which fields can be attached. You can consider bundles as subtypes of an entity type. With content nodes (an entity type), for example, you can generate bundles (subtypes) like articles, blog posts, or products. Not all entity types have bundles, however. For example, users do not have separate bundles (subtypes). For the entity types that do allow bundles, you can create as many bundles (subtypes) as you want. Then, using the Field system, you can add different fields to each bundle. Examples include a file download field on Basic Pages and a subtitle field on Articles.

Fields

A field is a reusable piece of content. In technical terms, each field is a primitive data type, with custom validators and widgets for editing and formatters for display. You can read further for a developer's guide to using the Drupal 7 Fields API.
What's important to know as it relates to Entities is that Fields can be added to any of the bundles (or entity types) to help organize their data. Say, for example, you create a content type with an unstructured text field and use HTML to structure parts of it, like a summary section, or prices. That would make it more difficult, then, to control how these were displayed, or to make connections between different types of related content. This is where using fields is essential.

Entity

An entity would be one instance of a particular entity type such as a comment, taxonomy term or user profile or a bundle such as a blog post, article or product.
You can use entity_load to load any entity. Note, however, that the core does not provide a save or delete function, but thanks to Entity API module the missing pieces are added (entity_create(), entity_save(), entity_delete(), entity_view() and entity_access()).

Putting this in Object-Oriented Design/Programming terms...

If you come from an OOD/P background and are trying to better understand what these key D7 concepts are, the following suggested mapping might help (albeit not strictly true from a purist’s perspective) :-
  • An entity type is a base class
  • bundle is an extended class
  • field is a class memberpropertyvariable or field instance (depending on your naming preference)
  • An entity is an object or instance of a base or extended class
All these four OOD/P concepts are special in that they are serialisable (stored - e.g. to a database or file). Serialisation takes place via the Entity API.

So what’s the big deal?

If you’re familiar with Drupal 6 and new to Drupal 7, this will sound like great news. In Drupal 6 and before, users and comments didn't have the same power that nodes (content) had. They couldn't have translations, fields, versioning, and so on. It also meant that systems such as Views, which relied on controlling the selection and listing of fields didn’t work as well with comments and users. Some experimentation was done with modules that turned comments or users into nodes. However, this meant that all the additional information in the node object was added to comments.
Instead, the community created this abstraction based on what was common between these different models of entity types. In this way, the Entity API allows for more lightweight and flexible solutions. There are many entity-aware modules, and more being developed with Drupal 7, which make it easier to relate content together, and gain a more flexible architecture.

Entity API module

The project Entity API extends the entity API of Drupal core in order to provide a unified way to deal with entities and their properties. Additionally, it provides an entity CRUD controller, which helps in simplifying the creation of new entity types.
Learn more about using the Entity API in your projects.


Monday, October 21, 2013

What's New in Drupal 7

New Minimum System Requirements:

This is not a complete list of requirements. Please read the complete list of requirements.
  • Database: MySQL 5.0.15 or PostgreSQL 8.3
  • PHP Version 5.2 or higher
  • PHP Memory: 40M - 64M

Security:

  • More secure implementation for scheduled tasks (cron.php).
  • More secure password system.
  • More secure log-in system.
  • Modules can be updated via the web.

Usability:

  • Administrative links to edit existing page elements are now available on each web page, without having to go to an administration page first.
  • Improved support for integration of WYSIWYG editors.
  • Added more drag-and-drop for administrative tasks.
  • Permissions now have the ability to handle more meta-data (permissions now have a description).
  • User 1 created as part of the installation process.
  • Added features to the default install profile (tagging on the Article content type).
  • Setting up automated task runs (cron) can now be achieved via Drupal's configuration alone, without having to install any scripts on the web server.
  • Redesigned password strength validator to make it kinder and gentler, and clearer.
  • Renamed "input formats" to "text formats".
  • Added support for default text formats to be assigned on a per-role basis.
  • Moved text format permissions to the main permissions page
  • Added "vertical tabs", a reusable interface component that features automatic summaries and increases usability.
  • Improved time zone support
  • Removed per-user themes: Contributed modules with similar functionality are available.
  • Added new "Shortcuts" module to allow user to create their own menu for the pages they visit the most.

Database:

  • Added query builders for INSERT, UPDATE, DELETE, MERGE, and SELECT queries.
  • Support for master/slave replication, transactions, multi-insert queries,delayed inserts, and other features.
  • Added support for the SQLite database engine.
  • Default to InnoDB engine, rather than MyISAM, on MySQL when available for greater scalability and data integrity.

Several Performance Improvements Implemented

Documentation:

  • Hook API documentation now included in Drupal core.

News aggregator:

  • Added OPML import functionality for RSS feeds.
  • Added feed update options.

Search:

  • Added support for language-aware searches.

Testing:

  • Added test framework and tests.

Theme system:

  • Removed the Bluemarine, Chameleon and Pushbutton themes. These themes live on as contributed themes
  • Added "Bartik" theme as the default user interface theme.
  • Added "Seven" theme as the default administration interface theme.
  • Added "Stark" theme to make analyzing Drupal's default HTML and CSS easier.

File handling:

  • Files are now first class Drupal objects with file_load(), file_save(),
    and file_validate() functions and corresponding hooks.
  • Files use PHP stream wrappers to enable support for both public and private files and to support pluggable storage mechanisms and access to remote resources (e.g. S3 storage or Flickr photos).
  • Added a field specifically for uploading files, previously provided by
    the contributed module FileField.

Image handling:

  • Improved image handling, including better support for add-on image
    libraries.
  • Added a field specifically for uploading images, previously provided by the contributed module ImageField.

Better Support for Multisite Installations

Added RDF support

Better support for search engine optimization and web linking

Added ability to add custom fields

  • Provides most of the features of the former Content Construction Kit (CCK) module.
  • Custom data fields may be attached to nodes, users, comments and taxonomy terms.
  • Node bodies and teasers are now fields instead of being a hard-coded property of node objects.
  • Fields are translatable.

Installer can be run from the command line

JavaScript changes

  • Upgraded the core JavaScript library to jQuery version 1.4.2.
  • Upgraded the jQuery Forms library to 2.36.
  • Added jQuery UI 1.8, which allows improvements to Drupal's user experience.

Improved node access control system

Task handling

  • Improved handling of long-running tasks.

Sunday, October 6, 2013

how to turn off iis 7?

stop and disable the www service
type services.msc from the run command prompt > scroll down to World Wide Publishing service.
or go to control panel > Administrative Tools > Services.msc > World Wide Publishing service.

Wednesday, August 28, 2013

Theme - Responsive Blog

Responsive Blog is a responsive multipurpose Drupal 7 theme. We have created the theme with a wide range of sites in mind.
Overall Responsive Blog has a very clean and elegant design without much clutter. Its a very sleek solution that will make any site really stand out and look fantastic. The theme is completely responsive, and has been tested on the iPhone and iPad for optimal performance. This is an all around great theme, useful for almost any project.

Features

  • Responsive, Mobile-Friendly Theme
  • 1-column and 2-coumns layout support
  • 2 pre-designed color schemes (White and Dark)
  • A total of 12 block regions
  • Configurable layout : Sidebar can be Right or Left
  • Mobile support (Smartphone, Tablet, iPhone, Android, etc)
  • Configurable jQuery Cycle Image Slideshow
  • Multi-level drop-down menus (Multilingual support)
  • Minimal design and nice typography
  • HTML5 & super clean markup
  • Facebook, Twitter and other Social Icon.
Read More

Wednesday, April 3, 2013

XAMPP for Linux


Step 1: Download

Simply click on one of the links below. It's a good idea to get the latest version. :)

A complete list of downloads (older versions) is available at SourceForge.

XAMPP for Linux 1.8.1, 2012/9/30

Version

Size

Notice
XAMPP Linux 1.8.1 81 MB Apache 2.4.3, MySQL 5.5.27, PHP 5.4.7 & PEAR + SQLite 2.8.17/3.6.16 + multibyte (mbstring) support, Perl 5.14.2, ProFTPD 1.3.4a, phpMyAdmin 3.5.2.2, OpenSSL 1.0.1c, GD 2.0.1, Freetype2 2.1.7, libjpeg 6b, libpng 1.2.12, gdbm 1.8.0, zlib 1.2.3, expat 1.2, Sablotron 1.0, libxml 2.7.6, Ming 0.4.2, Webalizer 2.21-02, pdf class 009e, ncurses 5.3, mod_perl 2.0.5, FreeTDS 0.63, gettext 0.17, IMAP C-Client 2007e, OpenLDAP (client) 2.3.11, mcrypt 2.5.7, mhash 0.8.18, eAccelerator 0.9.5.3, cURL 7.19.6, libxslt 1.1.26, libapreq 2.12, FPDF 1.6, XAMPP Control Panel 0.8, bzip 1.0.5, PBXT 1.0.09-rc, PBMS 0.5.08-alpha, ICU4C Library 4.2.1, APR (1.4.6), APR-utils (1.4.1)
MD5 checsum: e7092eafff81ad363de45d192774b4d6
Upgrade 1.8.0 to 1.8.1 32 MB Upgrade package. How to upgrade?
MD5 checksum: 990a56b93ba5a909a63b67ba4f0ac503
Development package 38 MB The development package contains all files you need if you want to compile other software packages for XAMPP by yourself and the Unix manual pages. Install this package like the normal XAMPP distribution:
tar xvfz xampp-linux-devel-1.8.1.tar.gz -C /opt
MD5 checksum: 1377159c73d9a5bfc0e930b122861ee6

Step 2: Installation

After downloading simply type in the following commands:
  1. Go to a Linux shell and login as the system administrator root: su
  2. Extract the downloaded archive file to /opt: tar xvfz xampp-linux-1.8.1.tar.gz -C /opt
    Warning: Please use only this command to install XAMPP. DON'T use any Microsoft Windows tools to extract the archive, it won't work.
    Warning 2: already installed XAMPP versions get overwritten by this command.
That's all. XAMPP is now installed below the /opt/lampp directory.

Step 3: Start

To start XAMPP simply call this command:
/opt/lampp/lampp start
You should now see something like this on your screen:
Starting XAMPP 1.8.1...
LAMPP: Starting Apache...
LAMPP: Starting MySQL...
LAMPP started.

Ready. Apache and MySQL are running.
If you get any error messages please take a look at the Linux FAQ.

Step 4: Test

OK, that was easy but how can you check that everything really works? Just type in the following URL at your favourite web browser: http://localhost
Now you should see the start page of XAMPP containing some links to check the status of the installed software and some small programming examples.

Read Me


A matter of security (A MUST READ!)

As mentioned before, XAMPP is not meant for production use but only for developers in a development environment. The way XAMPP is configured is to be open as possible and allowing the developer anything he/she wants. For development environments this is great but in a production environment it could be fatal.
Here a list of missing security in XAMPP:
  1. The MySQL administrator (root) has no password.
  2. The MySQL daemon is accessible via network.
  3. ProFTPD uses the password "lampp" for user "nobody".
  4. PhpMyAdmin is accessible via network.
  5. Examples are accessible via network.
  6. MySQL and Apache running under the same user (nobody).
To fix most of the security weaknesses simply call the following command:
/opt/lampp/lampp security
It starts a small security check and makes your XAMPP installation quite secure. For example this protects the XAMPP demo pages by a username ('lampp') and password combination.

Advanced start and stop parameters

Until version 0.9.4 /opt/lampp/lampp could only start and stop XAMPP. Since version 0.9.5 it learned a lot of new things to do.
START AND STOP PARAMETERS
Parameter Description
start Starts XAMPP.
stop Stops XAMPP.
restart Stops and starts XAMPP.
startapache Starts only the Apache.
startssl Starts the Apache SSL support. This command activates the SSL support permanently, e.g. if you restarts XAMPP in the future SSL will stay activated.
startmysql Starts only the MySQL database.
startftp Starts the ProFTPD server. Via FTP you can upload files for your web server (user "nobody", password "lampp"). This command activates the ProFTPD permanently, e.g. if you restarts XAMPP in the future FTP will stay activated.
stopapache Stops the Apache.
stopssl Stops the Apache SSL support. This command deactivates the SSL support permanently, e.g. if you restarts XAMPP in the future SSL will stay deactivated.
stopmysql Stops the MySQL database.
stopftp Stops the ProFTPD server. This command deactivates the ProFTPD permanently, e.g. if you restarts XAMPP in the future FTP will stay deactivated.
security Starts a small security check programm.
For example: To start Apache with SSL support simply type in the following command (as root):
/opt/lampp/lampp startssl
You can also access your Apache server via SSL under https://localhost.

* What is where?

What is where? A big question of our existens, here are some answers! ;)

What is where? A big question of our existens, here are some answers! ;)
IMPORTANT FILES AND DIRECTORIES
File/Directory Purpose
/opt/lampp/bin/ The XAMPP commands home. /opt/lampp/bin/mysql calls for example the MySQL monitor.
/opt/lampp/htdocs/ The Apache DocumentRoot directory.
/opt/lampp/etc/httpd.conf The Apache configuration file.
/opt/lampp/etc/my.cnf The MySQL configuration file.
/opt/lampp/etc/php.ini The PHP configuration file.
/opt/lampp/etc/proftpd.conf The ProFTPD configuration file. (since 0.9.5)
/opt/lampp/phpmyadmin/config.inc.php The phpMyAdmin configuration file.

* Stopping XAMPP

To stop XAMPP simply call this command: /opt/lampp/lampp stop
You should now see:
Stopping LAMPP 1.8.1...
LAMPP: Stopping Apache...
LAMPP: Stopping MySQL...
LAMPP stopped.

And XAMPP for Linux is stopped.

* Uninstall

To uninstall XAMPP just type in this command: rm -rf /opt/lampp
The end.

Saturday, March 30, 2013

Drush Commands

Core drush commands

archive-dumpBackup your code, files, and database into a single file.
archive-restoreExpand a site archive into a Drupal web site.
cache-clearClear a specific cache, or all drupal caches.
cache-getFetch a cached object and display it.
cache-setCache an object expressed in JSON or var_export() format.
core-configEdit drushrc, site alias, and Drupal settings.php files.
core-cronRun all cron hooks in all active modules for specified site.
core-executeExecute a shell command. Usually used with a site alias.
core-quick-drupalDownload, install, serve and login to Drupal with minimal configuration and dependencies.
core-requirementsProvides information about things that may be wrong in your Drupal installation, if any.
core-rsyncRsync the Drupal tree to/from another server using ssh.
core-statusProvides a birds-eye view of the current Drupal installation, if any.
core-topicRead detailed documentation on a given topic.
drupal-directoryReturn path to a given module/theme directory.
helpPrint this help message. See `drush help help` for more options.
image-flushFlush all derived images for a given style.
php-evalEvaluate arbitrary php code after bootstrapping Drupal (if available).
php-scriptRun php script(s).
queue-listReturns a list of all defined queues
queue-runRun a specific queue by name
search-indexIndex the remaining search items without wiping the index.
search-reindexForce the search index to be rebuilt.
search-statusShow how many items remain to be indexed out of the total.
self-updateCheck to see if there is a newer Drush release available.
shell-aliasPrint all known shell alias records.
site-aliasPrint site alias records for all known site aliases and local sites.
site-installInstall Drupal along with modules/themes/configuration using the specified install profile.
site-resetReset a persistently set site.
site-setSet a site alias to work on that will persist for the current session.
site-sshConnect to a Drupal site's server via SSH for an interactive session or to run a shell command
test-cleanClean temporary tables and files.
test-runRun tests. Note that you must use the --uri option.
updatedbApply any database updates required (as with running update.php).
usage-sendSend anonymous Drush usage information to statistics logging site. Usage statistics contain the Drush command name and the Drush option names, but no arguments or option values.
usage-showShow Drush usage information that has been logged but not sent. Usage statistics contain the Drush command name and the Drush option names, but no arguments or option values.
variable-deleteDelete a variable.
variable-getGet a list of some or all site variables and values.
variable-setSet a variable.
versionShow drush version.
watchdog-deleteDelete watchdog messages.
watchdog-listShow available message types and severity levels. A prompt will ask for a choice to show watchdog messages.
watchdog-showShow watchdog messages.

Runserver commands

runserverRuns a lightweight built in http server for development.

Field commands

field-cloneClone a field and all its instances.
field-createCreate fields and instances. Returns urls for field editing.
field-deleteDelete a field and its instances.
field-infoView information about fields, field_types, and widgets.
field-updateReturn URL for field editing web page.

Project manager commands

pm-disableDisable one or more extensions (modules or themes).
pm-downloadDownload projects from drupal.org or other sources.
pm-enableEnable one or more extensions (modules or themes).
pm-infoShow detailed info for one or more extensions (modules or themes).
pm-listShow a list of available extensions (modules and themes).
pm-refreshRefresh update status information.
pm-releasenotesPrint release notes for given projects.
pm-releasesPrint release information for given projects.
pm-uninstallUninstall one or more modules.
pm-updateUpdate Drupal core and contrib projects and apply any pending database updates (Same as pm-updatecode + updatedb).
pm-updatecodeUpdate Drupal core and contrib projects to latest recommended releases.

SQL commands

sql-cliOpen a SQL command-line interface using Drupal's credentials.
sql-connectA string for connecting to the DB.
sql-createCreate a database.
sql-dropDrop all tables in a given database.
sql-dumpExports the Drupal DB as SQL using mysqldump or equivalent.
sql-queryExecute a query against the site database.
sql-syncCopy and import source database to target database. Transfers via rsync.

User commands

user-add-roleAdd a role to the specified user accounts.
user-blockBlock the specified user(s).
user-cancelCancel a user account with the specified name.
user-createCreate a user account with the specified name.
user-informationPrint information about the specified user(s).
user-loginDisplay a one time login link for the given user account (defaults to uid 1).
user-password(Re)Set the password for the user account with the specified name.
user-remove-roleRemove a role from the specified user accounts.
user-unblockUnblock the specified user(s).

Other commands

makeTurns a makefile into a working Drupal codebase.
make-generateGenerate a makefile from the current Drupal site.

Global Options (see `drush topic core-global-options` for the full list)

-r <path>, --root=<path> Drupal root directory to use (default: current directory).
-l <http://example.com:8888>, --uri=<http://example.com:8888> URI of the drupal site to use (only needed in multisite environments or when running on an alternate port).
-v, --verbose Display extra information about the command.
-d, --debug Display even more information, including internal messages.
-y, --yes Assume 'yes' as answer to all prompts.
-n, --no Assume 'no' as answer to all prompts.
-s, --simulate Simulate all relevant actions (don't actually change the system).
-p, --pipe Emit a compact representation of the command for scripting.
-h, --help This help system.
--version Show drush version.
--php=</path/to/file> The absolute path to your PHP intepreter, if not 'php' in the path.
-ia, --interactive Force interactive mode for commands run on multiple targets (e.g. `drush @site1,@site2 cc --ia`).


Tuesday, February 19, 2013

Caching: Modules that make Drupal scale

There are many ways to improve the performance & scalability of Drupal.
Comparison of a selection of performance and scalability modules:

Read Full ....

8 Popular online apps to test the mobile version of your site

The mobile revolution has inspired major and minor websites alike to have a mobile version. Mobile versions can be created using themes, extensions, and other modifications.
While developing mobile version, you may want to test it on two, three, or even five different mobile handsets. After development, you are not aware how it will appear in each mobile present on this Earth as you have to buy each of them to test it manually.
Let us make this work simple for you by collecting some tools in this article to test the mobile version of your website.
You can test your mobile website on these tools, analyze it for the mistakes/errors, and then optimize it according to the recommendations. Let us have a look at some of the mobile testing applications available online.

1. W3C mobileOK Checker

W3C tops the list every time you come to the field of website testing. This time also, W3C mobileOK Checker tops the web-based mobile testing tools. You just have to visit its website and enter the URL to test and it will show whether your website is mobile-ready or not, along with what you can do to rectify any errors.

2. Ready.Mobi

Ready.Mobi is a service of dotMobi and an extension of W3C MobileOk Checker Service. It analyzes your website and provide the results in graph format whether the website is optimized well for mobile or not. You can check one web page without registering, but you have to create an account to test the whole website.

3. Google Mobile Testing

Google also has tools for testing your website for mobile. Visit the Mobile Testing site, enter the URL of your website, and press Enter. It will show the website in mobile format and you can check whether it is showing up correctly or not.

4. iPad Peek

Currently, Apple iPad is the highest selling tablet. If you are optimizing your website for mobile, then you should also check its compatibility for iPad (be sure to check your regular site here, not just the mobile version). Visit the iPad Peek website, enter the URL and press enter to show how your website looks on iPad.

5. Test iPhone

With all controversies, Apple iPhone is still one of the best selling smartphones around the globe. Do not miss iPhone testing while checking your website on Android, Symbian, and Windows Mobile platforms. You just have to visit the Test iPhone website, enter the URL and press Enter to do iPhone testing of your website.

6. Gomez

If you’re fed up with testing on emulators and web-based apps and thinking about buying a premium mobile website testing service, go for Gomez as it provides a “Try Before You Buy” option. You just have to fill out a small form and it will send the images captured on iPhone 3Gs, iPad, BlackBerry Storm 2, and Google Nexus One.

7. Opera Mobile Emulator

Opera is one of the best mobile Web browsers available in the market. Almost every Java-compatible handset supports either Opera Mini or Opera Mobile. Opera is also available for iPhone, Android, and Symbian platforms. You can test your website on this mobile browser by visiting its online demo.

8. BOLT Demo

BOLT is another leading mobile web browser. It mainly works on Java-compatible mobiles but the company also plans to launch an Android version. Test your Website on BOLT by using its online demo.

only show translated menu items into current language (Drupal 8)

function MY_THEME_preprocess_menu(&$variables) {   if ($variables['menu_name'] == 'brancott-header-menu') {    $langu...